Sunday, November 24, 2019

Steps to show and hide button using javascript Ribbon Bench


Ribbon customization show /hide button using javascript

  1. Install ribbon bench managed solution
  2. Import the ribbon bench managed solution
  3. Go setting ->customization->Click on ribbon bench
  4. Open solution which should contain entity and javascript logic to show/hide
  5. Add new button on the form
  6. Add the command on the new button
  7. Add enable rule ->custom rule->give websource name and display
  8. Add  parameter in enable rule ->Crm parameter->primary control
  9. Add the newly added enable rule to command 


Perform action after button click

  1. Add action on the command ->select javascript ->add function
  2. Add parameter->crm parameter-.>primary control

Display rule:
  1. Show/hide button based on field value->add display rule
  2. Add value rule->field name->value


Thursday, November 21, 2019

Retrieve more than 5k Records using Fetchxml


I was working on a piece of C# code to retrieve more than 5000 records using Fetchxml. This may get bit tricky, so tried to simply the same as much as possible in the below post.

By default an organization service can return only the first five thousand records and page details for the next set of records, if exists.

The result entity collection exposes a Boolean attribute called MoreRecords, it will be true if more records available else false.

If more records available then we need to use the combo of pagingcookie and page(pagenumber) to retrieve rest of the records.

**Do not forget to add {0} in fetchxml which is used to include page details in below code

Code Snippet:

        public List<Entity> RetrieveAllRecords(IOrganizationService service, string fetch)
        {
            var moreRecords = false;
            int page = 1;
            var cookie = string.Empty;
            List<Entity> Entities = new List<Entity>();
            do
            {
                var xml = string.Format(fetch, cookie);
                var collection = service.RetrieveMultiple(new FetchExpression(xml));

                if (collection.Entities.Count >= 0) Entities.AddRange(collection.Entities);

                moreRecords = collection.MoreRecords;
                if (moreRecords)
                {
                    page++;
                    cookie = string.Format("paging-cookie='{0}' page='{1}'", System.Security.SecurityElement.Escape(collection.PagingCookie), page);
                }
            } while (moreRecords);

            return Entities;
        }


Example:

            var fetch = "<fetch {0}>" +
                        "    <entity name='accounts' >" +
                        "        <attribute name='accountid' />" +
                        "        <attribute name='name' />" +
                        "    </entity>" +
                        "</fetch>";
            var accountCol = RetrieveAllRecords(service, fetch);

Calling Action from BPF


In this post , we are going to see about calling action from BPF.
> Action step you can trigger workflow as well as Action.
>Action which we want to trigger must be allowed to run as a business process flow.
Action which has option “As a Business Process flow action step” Selected.
>Action with Input parameter as Entity, Entity Reference or Option sets are not allowed for BPF action steps.
> Action with output parameters as Entity, Entity Reference or Option sets are not allowed for BPF action steps.
> On-demand workflow should be for the same entity as of BPF stage.
Suppose you have stage for account entity and workflow created for contact you cannot call for account stage.
> Action cannot be Global, it should be for the same entity as of BPF stage.
Suppose you have stage for account entity and Action created for contact you cannot call for account stage.
>You can Copy,Cut and Paste action step.
> There is no specific Max Limit of actions which can be called from BPF.
I tried adding 50 actions and it all got triggered.
Note: You can only use supported processes that match the stage entity.
Now you know what things to consider while creating an action, let kick action in our BPF.
Account Record BPF, with no Action step
BPF with no Action step
Add Action step In stage
Notice, My stage is for Account Entity,
So i have to create action/Workflow for Account entity only to include in this BPF.
n properties Section, Execute process lookup will list all the Workflow which is on demand, activated and on Account Entity OR action which is Activated, On Account Entity and is Allowed to used in BPF.

I am selecting action i have created for account entity.


This Action has 2 input parameter {FirstName and LastName} which is of data type string

This Action Create contact for current account with First name as account Name and Last Name as Account Number.

Passing input parameters from account record to action step.

Passing Input parameter from Account Record to Action.
Create Account, this stage, Action step will be disabled as Records is not created
Once Record is created, Action step will be Enabled
Notice : This Action step Looks like Button and you click and then Action will be triggered.
Click action step and fill up the missing fields if any and click OK.

Contact Created via Action.
This was you can add any logic in your Action and just call from BPF.

Sunday, November 17, 2019

Update Child Records in Dynamics 365 using Microsoft Flow

Update Child Records in Dynamics 365 using Microsoft Flow


It has been a vexing challenge to keep Contact records updated with information that changes on their parent Account Record. The only solution to date has been to write a plugin to update Child records when the Parent record is updated. This required someone who knew the SDK and could write C# code.  Once it got coded it was expensive to maintain as any change in the logic required getting the developer involved again. It wasn’t Functional Consultant friendly.
Microsoft Flow comes to the rescue! Using the Common Data Service triggers and actions with a little bit of geeky expression writing thrown in, it now can be done and updated easily.
The example below is for the typical Account – Contact relationship. But it could be morphed into any entity type that use parent/child relationships.
I will outline the 3.5 step process.
Updating Child records When a Parent Record Changes
Step 1 – Create the Trigger event – in this case I have set the trigger to fire when an Account record is updated without specifying any specific field. I am also configuring it to run only on records I own.
Common Data Service Trigger when a record is updated
Step 2 – This is where I tell Flow to find all the Contact records whose Parent record is the one from the previous step. The key element here is the ODATA filter query (thank you David Yack for your hint) – be sure to include the underscores. The dynamic value is the Account GUID from the record in Step 1.
Step 3 – Now select the Update Record Action. Once you do this and fill in the fields, Flow takes care of the Apply to each loop. So don’t get confused by this and look for a Apply to each. You don’t need to do this. Just add the Update Record action.
Common Data Service Action Update Records
Step 3.5 – This is where you specify which fields in the Parent Account (the source) are pushed to the Child Record(s) (the target). In this example I am getting the Main Phone number field from the Account and updating all the Contacts records Business Phone Field.
Common Data Service Action Update Records Field Mapping

Calling Action through Power Automate


Introduction

As Microsoft is providing us more flexibility with Power Automate (MS Flow), recently we found that now we can call the Action through Power Automate (MS Flow) directly. Previously we used to call an Action through HTTP request, but now we can directly call an Action through the Power Automate (flow) steps.
Before that take a short look at what are Bound and Unbound Action?
Bound Action are targeted to the entity and Unbound Action are not bound to the any entity, they are Global.
To get the Bound and Unbound actions in Power Automate (MS Flow) follow the steps given below:
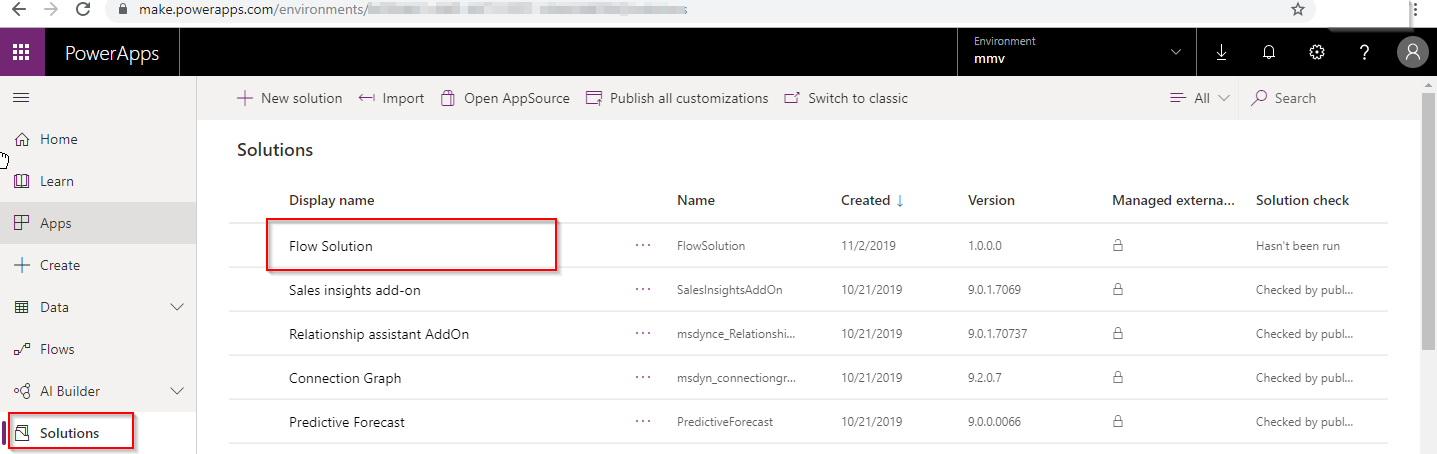
1. Create a solution in https://make.powerapps.com/ where you have to add your Power Automate (Ms Flow) which we are going to use to call Actions.
Call an Action through Power Automate
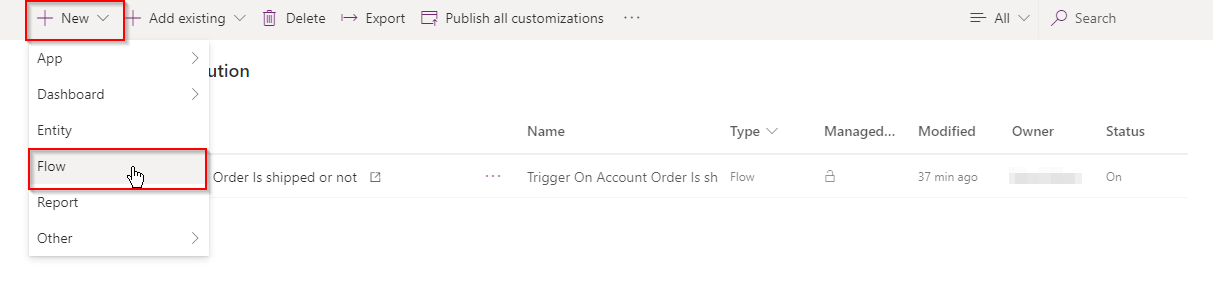
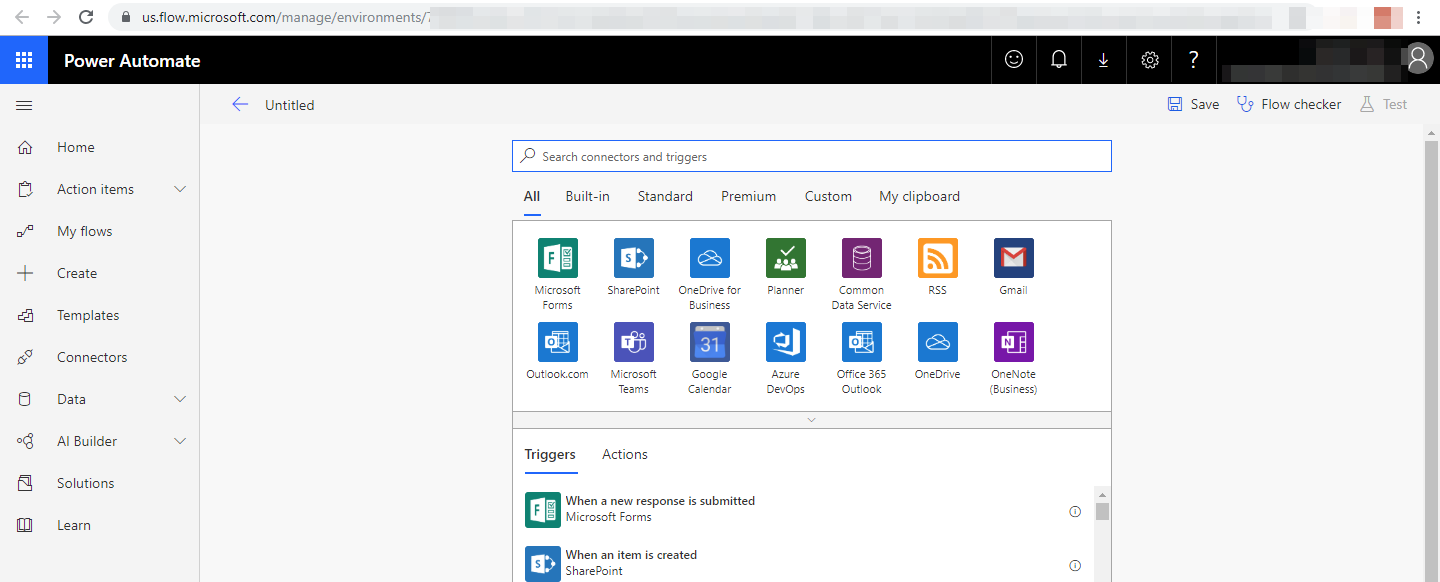
2. In the solution click on new button & select Flow as shown in below image. Apparently it will redirect you to Power Automate (MS Flow) window as shown in the following image.
Call an Action through Power Automate
Power Automate
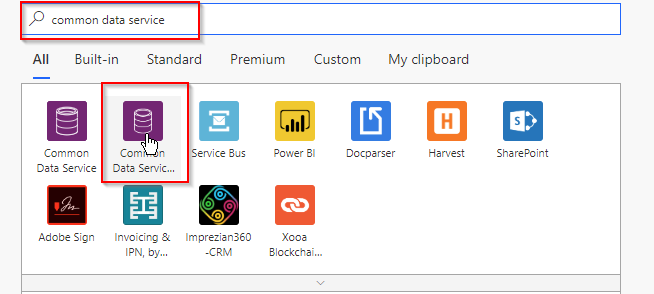
3. Now we have to Search for Common Data Service Trigger point in our newly created Flow & from the search result select the Common Data Service (Current Environment).Select the trigger conditions as per requirements such as Create, Create or update, Delete, Update etc.
Call an Action through Power Automate
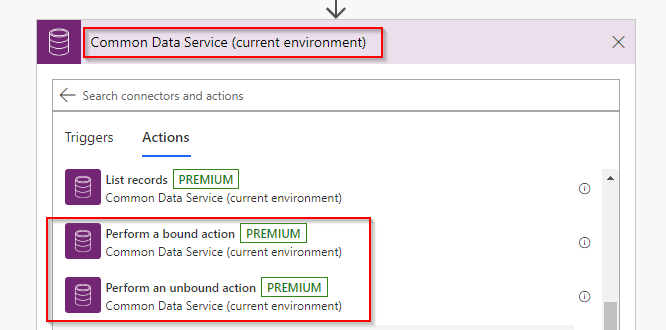
4. Now in the next step we have to search for the action & select the Common Data Service (Current Environment). You will get many new action points in the results from that we have to select Bound/Unbound Action.
Call an Action through Power Automate
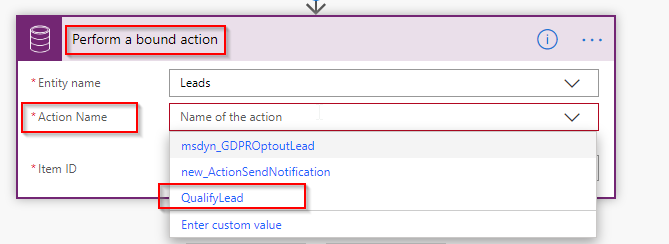
For the bound action you will see the Action step as shown in below image. In my case I have selected the QualifyLead action which is bounded with the Lead entity.
Call an Action through Power Automate
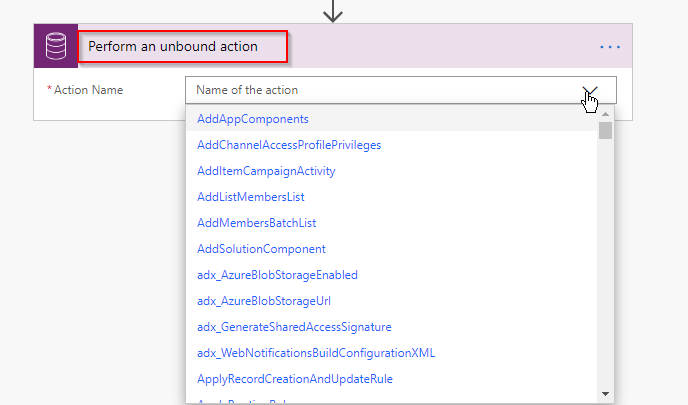
And for unbound step you will get to see the below window in which you can call your global action or the action which is not bounded with the any entity which will be listed in the unbound action.
Call an Action through Power Automate
Note: – You will find this Bound & Unbound action trigger steps when you create a Power Automate (MS flow) from the https://make.powerapps.com/ platform.

Friday, November 15, 2019

Enable Business Card Scanner - Dynamics 365


Enable Business Card Scanner - Dynamics 365

In this post , we are going to looking into how to enable the business card scanner in dynamics 365. Business card provide by potential customer or lead details will get filled by scanning the image of business card. Its nice feature introduced by microsoft. Lets take a look how to enable.

1. Setting->System Setting->Sales Tab ->Save Business card image as yes


2. Go to contact or lead ->Click + symbol for quick create and you can see the Scan business card button


Click Scan business card button->Select your business card image


Click on Save and Close


Contact record created in CRM !!


Calling HTML page from javascript

Calling HTML page from javascript

  • Open an HTML web resource named “new_webResource.htm”:
    Xrm.Navigation.openWebResource("new_webResource.htm");
  • Open an HTML web resource, setting the windowOptions:

    var windowOptions = { openInNewWindow: true, height: 400, width: 400 }
Xrm.Navigation.openWebResource("new_webResource.htm",windowOptions);

Open an HTML web resource including a single item of data for the data parameter

Xrm.Navigation.openWebResource("new_webResource.htm",null,"dataItemValue");

Executing Actions using JavaScript / C# in Dynamics 365


Executing Actions using JavaScript / C# in Dynamics 365

In Dynamics 365 we have feasibility to trigger Actions from Client-side code and Server-side code both. Let’s have a look how it can be achieved.
I have created an action with name new_GreetAction(see images below), it’s a global action and has Input and Output Argument both. We will see how to call it programmatically.
 

Calling Actions using C#

In C# we can call it using OrganizationRequest by setting Action Name in RequestName parameter or passing it in constructor.
// calling action
var executeAction = orgService.Execute(
    new OrganizationRequest("new_GreetAction") {
        Parameters = {
            { "InArg", "Ashish" }
        }
    });
To read output arguments you can pass argument name in indexer.
//Reading output arguments
var OutArg = executeAction["OutArg"];
If your action is Not Global Action then you can pass targeted record in Target parameter, and yes you can pass parameters as indexer also.
var executeAction = orgService.Execute(
    new OrganizationRequest()
    {
        RequestName = "new_GreetAction",
        ["Target"] = new EntityReference("logcal name", new Guid("guid of record")),
        ["InArgument"] = "Value"
    });
To test the above snippet, you can feel free to use Dynamics 365 Console Caller

Calling Actions using JavaScript Ajax

It’s really easy with CRMRESTBuilder see generated code below.
var parameters = {};
parameters.InArg = "Ashish";

var req = new XMLHttpRequest();
req.open("POST", Xrm.Page.context.getClientUrl() + "/api/data/v9.0/new_GreetAction", true);
req.setRequestHeader("OData-MaxVersion", "4.0");
req.setRequestHeader("OData-Version", "4.0");
req.setRequestHeader("Accept", "application/json");
req.setRequestHeader("Content-Type", "application/json; charset=utf-8");
req.onreadystatechange = function() {
    if (this.readyState === 4) {
        req.onreadystatechange = null;
        if (this.status === 200) {
            var results = JSON.parse(this.response);
            alert(results.OutArg)
        } else {
            Xrm.Utility.alertDialog(this.statusText);
        }
    }
};
req.send(JSON.stringify(parameters));

Making Request in modern way using Fetch

var clientUrl = Xrm.Page.context.getClientUrl();
var parameters = {};
parameters.InArg = "Ashish";

fetch(
    clientUrl + "/api/data/v9.0/new_GreetAction",
    {
     body:JSON.stringify(parameters),
        headers: {
            "Accept": "application/json",
            "Content-Type": "application/json; charset=utf-8",
            "OData-MaxVersion": "4.0",
            "OData-Version": "4.0"
        },
        credentials: "same-origin",
        method: "POST"
    })
    .then(response =>  response.json())
    .then(data => alert(data.OutArg))
    .catch(error => console.error("Error:", error));

Call Global Custom Action using JavaScript in Dynamics 365


Call Global Custom Action using JavaScript in Dynamics 365

Sometimes there are scenarios you need to create Global Actions where you don't specify an entity in particularly. When you create such global action and if you need to call that action from your JavaScript code or on Button Click. Here is the way to do that.

Example of calling Global Action Without Parameters:

Create a Global Action


Add Steps and Copy Action Unique Name (My Custom Action)


JavaScript to call Action

//Execute the created global action using Web API.
function CallGlobalCustomAction() {
    
    //get the current organization name
    var serverURL = Xrm.Page.context.getClientUrl();

    //query to send the request to the global Action 
    var actionName = "new_MyCustomAction"; // Global Action Unique Name

    //Pass the input parameters of action
    var data = {};

    //Create the HttpRequestObject to send WEB API Request 
    var req = new XMLHttpRequest();
    //Post the WEB API Request 
    req.open("POST", serverURL + "/api/data/v8.0/" + actionName, true);
    req.setRequestHeader("Accept", "application/json");
    req.setRequestHeader("Content-Type", "application/json; charset=utf-8");
    req.setRequestHeader("OData-MaxVersion", "4.0");
    req.setRequestHeader("OData-Version", "4.0");

    req.onreadystatechange = function () {
        if (this.readyState == 4 /* complete */)
        {
            req.onreadystatechange = null;
           
            if (this.status == 200 || this.status == 204)
            {
                alert("Action Executed Successfully...");
               
            }
            else
            {
                var error = JSON.parse(this.response).error;
                alert("Error in Action: "+error.message);
            }
        }
    };
    //Execute request passing the input parameter of the action 
    req.send(window.JSON.stringify(data));
}


Example of calling Global Action with Parameters:


JavaScript to call Action

//Execute the created global action using Web API.
function CallGlobalCustomAction() {
    
    //get the current organization name
    var serverURL = Xrm.Page.context.getClientUrl();

    //query to send the request to the global Action 
    var actionName = "new_MyCustomAction"; // Global Action Unique Name

    //set the current loggedin userid in to _inputParameter of the 
    var InputParameterValue = Xrm.Page.context.getUserId();
 
    //Pass the input parameters of action
    var data = {
    "MyInputParameter": InputParameterValue
    };
//Create the HttpRequestObject to send WEB API Request var req = new XMLHttpRequest(); //Post the WEB API Request req.open("POST", serverURL + "/api/data/v8.0/" + actionName, true); req.setRequestHeader("Accept", "application/json"); req.setRequestHeader("Content-Type", "application/json; charset=utf-8"); req.setRequestHeader("OData-MaxVersion", "4.0"); req.setRequestHeader("OData-Version", "4.0"); req.onreadystatechange = function () { if (this.readyState == 4 /* complete */) { req.onreadystatechange = null; if (this.status == 200 || this.status == 204) { alert("Action Executed Successfully...");

               //You can get the output parameter of the action with name as given below
               result = JSON.parse(this.response);
               alert(result.MyOutputParameter);
} else { var error = JSON.parse(this.response).error; alert("Error in Action: "+error.message); } } }; //Execute request passing the input parameter of the action req.send(window.JSON.stringify(data)); }