Create chatbot using Dynamics 365 Virtual Agent for your Customer
Introduction
Customer service is the key aspect of any organization that add value to their growth. It becomes very important for organizations to focus on satisfying the customers with their services. We know email, phone call are the channels that the customer use to reach out to the organization and get what they are looking for. But it is important for an organization to keep up with the latest technology that can be incorporate to engage with customers and provide services to customers wherever they are.
In recent years, we can see the use of chatbot has increased because it provides immediate customer service without human interaction. What if you want to add or create chatbot to provide customer service?
Dynamics 365 Virtual Agent is a new Microsoft Dynamics 365 feature (which is in preview) that helps Dynamics 365 CRM users to create powerful chat bots using no-code graphical interface. In this blog, we will see how to create a bot for real-world scenario using Dynamics 365 Virtual Agent.
Scenario:
Suppose you have a website to help your customer to find the details about your services/products and contact details to reach out to your organization’s Customer Service Representative. Now you want to add chat bot on your website which will allow your customers to ask the questions to the bot and get the answers. But in some cases, you would want to validate the customer’s identity. For example, the customer asks the bot to show me my outstanding payment. Before bot answers, the bot should validate the customer’s identity. It should check whether we have his record in our Dynamics CRM system or not. If yes then only answer the question.
Let’s jump into the Dynamics 365 Virtual Agent feature and see how to use that in the above scenario.
Create Bot using Dynamics 365 Virtual Agent:
Kindly note that the Dynamic 365 Virtual Agent feature is in preview now and is available to try on US region only. It will be available for production use by October 2019.
1. Sign up for Dynamics 365 Virtual Agent for customer service. Go to ms/virtual-agent and click on Try Preview button and then sign up using your existing work email address.
2. After performing this step you will get the require license for Dynamics 365 Virtual Agent application. You will get the access to https://va.ai.dynamics.com . This is the URL from where you can create multiple new bots and can manage those. In my case, I have created bot and named it as ‘Demo Bot’.
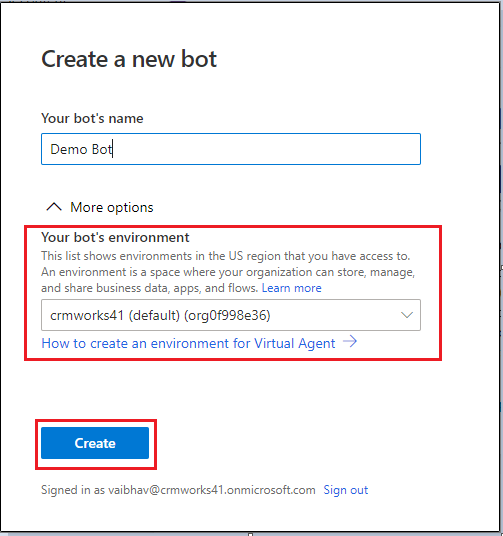
3. While creating a bot you have to specify name of the bot and select the environment. Since this Dynamics 365 Virtual Agent feature is currently available for US region, you will only be able to select the environment created in the US region. If you do not have one then you can create it from Power App. Click on “How to create an environment for Virtual Agent” link. This will guide you to create new environment.
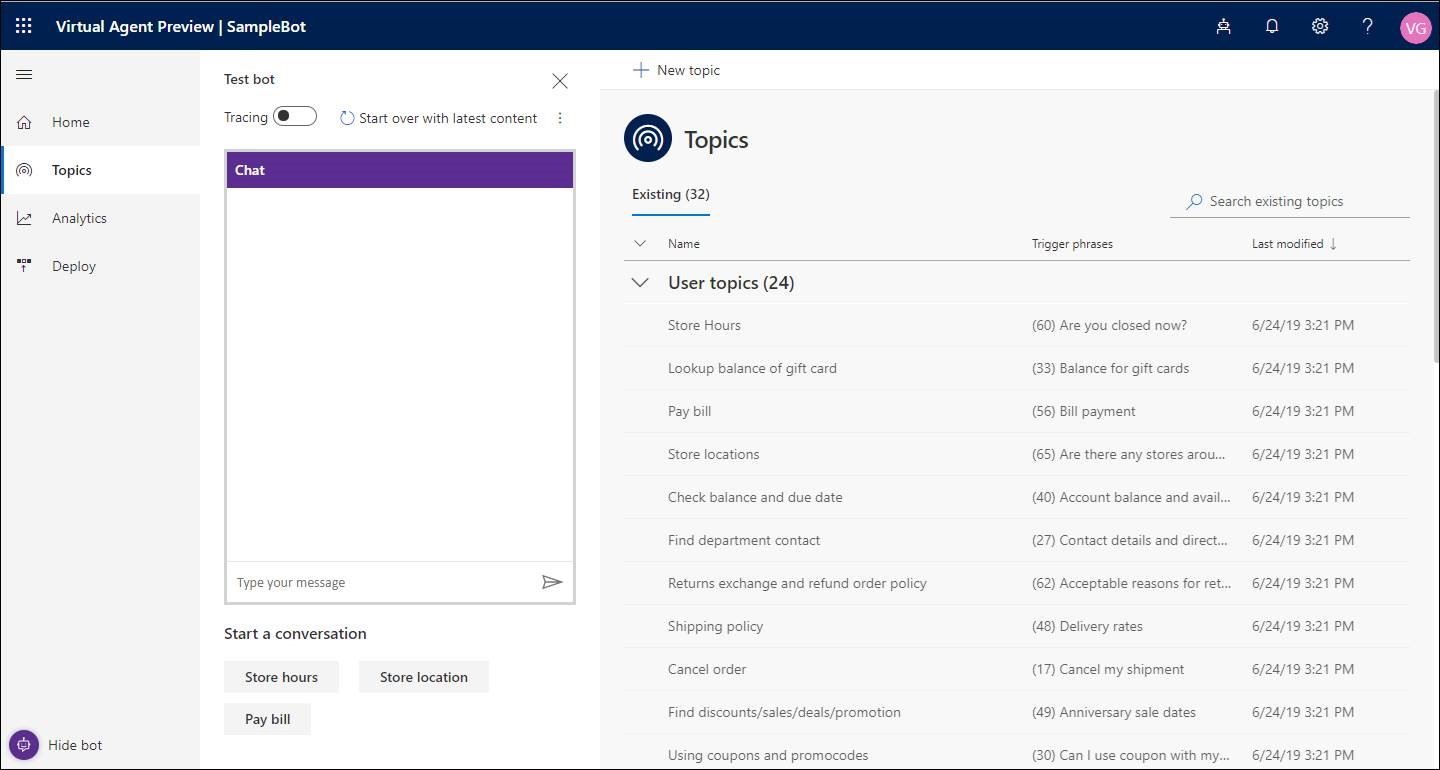
4. The bot is created with some default standard topics that we can use and also create our own topics. Topics is the area where we have to configure what bot should do when the user asks the questions.
5. Here, I am going to create a new Topic which will trigger when user asks for outstanding payment. Click on ‘New topic’ button to create a new Topic. Give name and add description for it and save it using ‘Save Topic’ button. Add appropriate trigger phrases. In my case I have added the following:
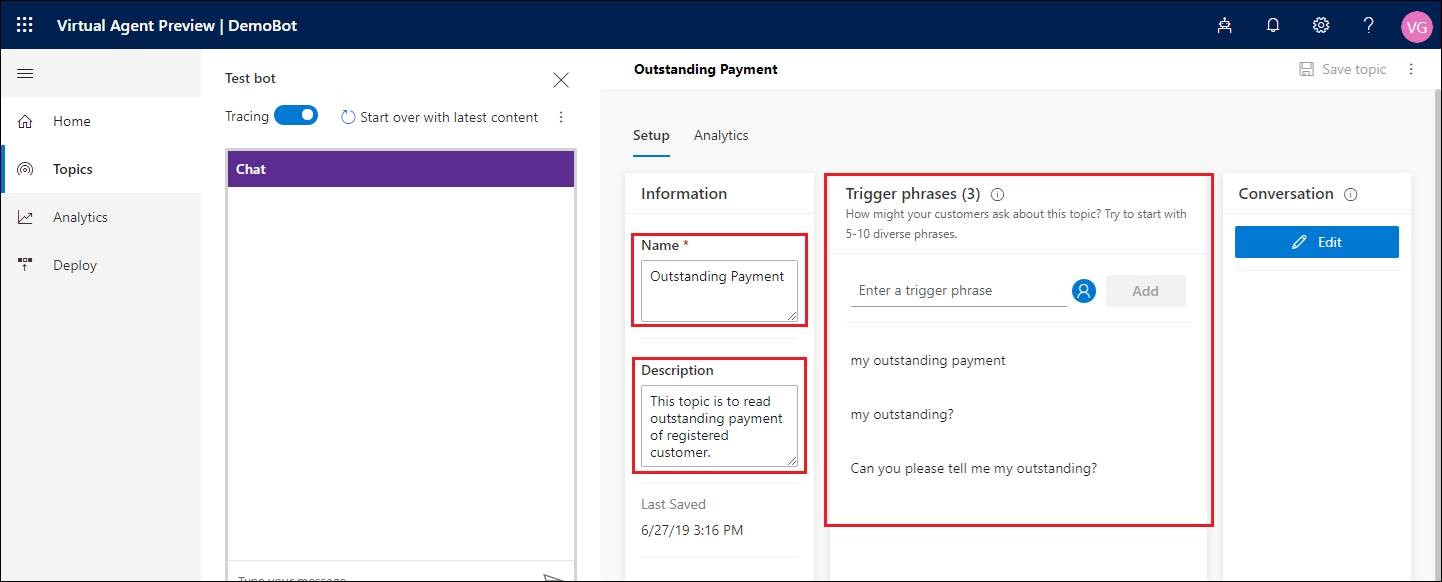
So when customer type any of the above phrases this topic will get trigger and will run the conversation.
*Whenever you edit the topic do not forgot to save it.
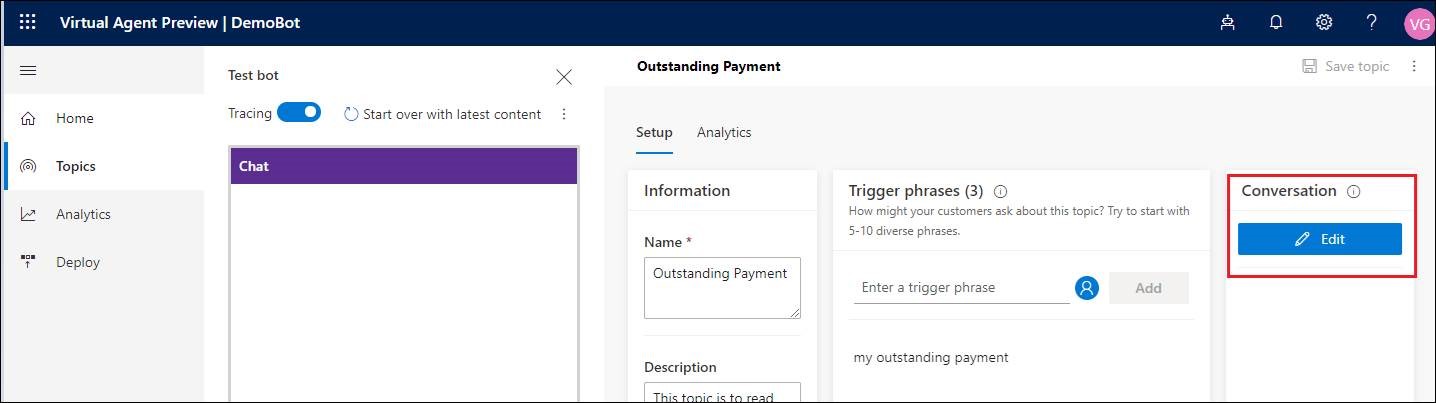
6. Next step is to edit the conversation. In this area we actually configure what bot should do. Click on below highlighted Edit button to edit the conversation.
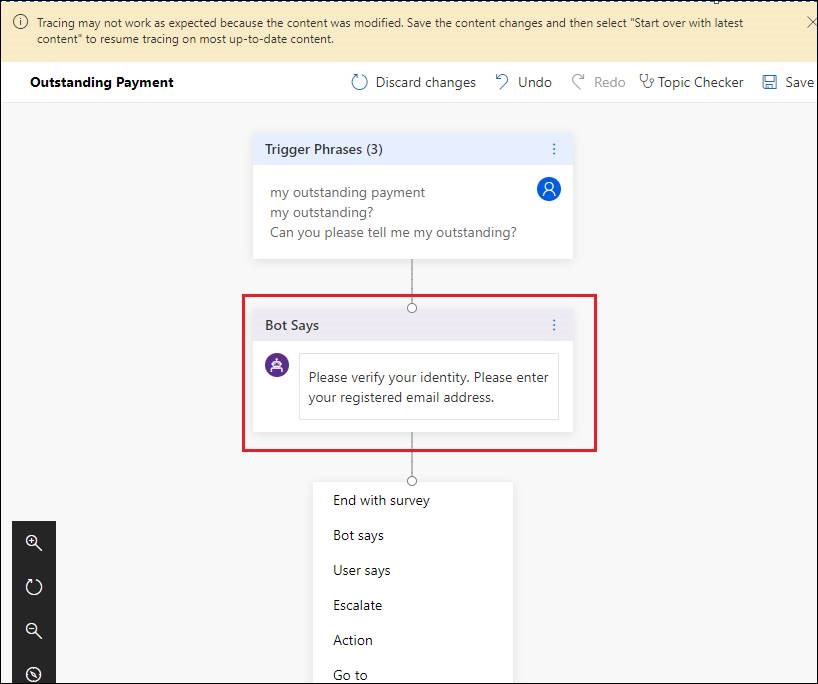
7. As we need to verify the customer, we will ask bot to get the email address from the customer. Enter appropriate message in ‘Bot Says’ step. This message will be displayed when the customer asks for outstanding payment.
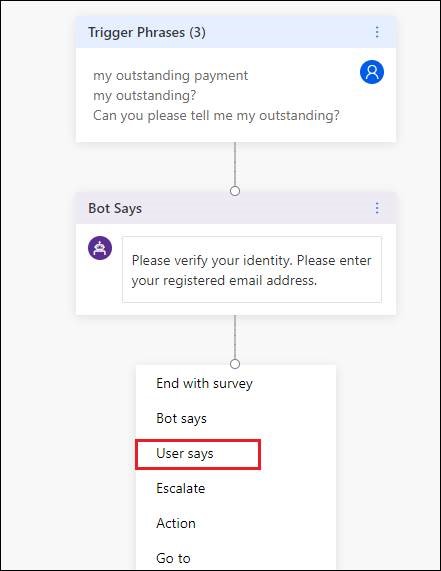
8. After that capture the customer’s response in a variable that we will then pass to the Microsoft Flow which will in turn revert whether customer is valid or not. Click on ‘User says’ to capture user’s response.
9. Delete the user response and add new variable as shown below:
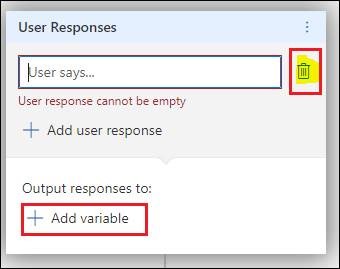
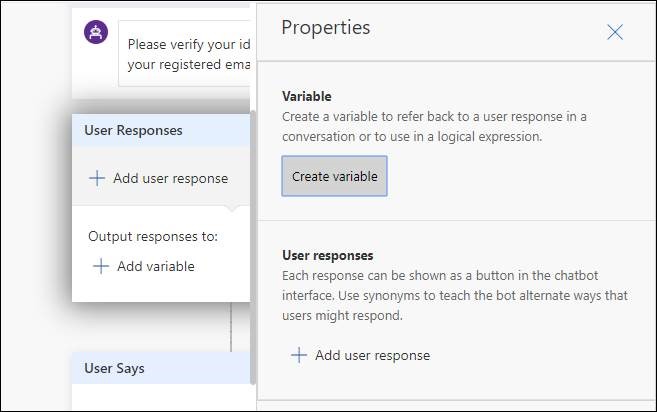
Create a new variable of type ‘Text’ to store the email address.

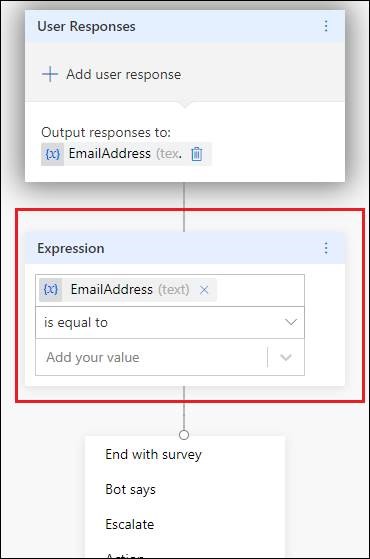
Delete the below expression that get added when we add variable to capture output response.
10. At this stage we have to ask the customer to enter the email address and capture it in ‘EmailAddress’ variable. Now we need to pass this email address to Microsoft Flow. So first, we will create a Microsoft Flow.
11. Go to https://web.powerapps.com . Select the environment which got created while registering for Dynamics 365 Virtual Agent. In my case you can see two environments – one is my Dynamics 365 Customer Engagement environment (crmworks41) and another is Virtual Agent environment (crmworks41 (default)).
Select the Virtual Agent environment.
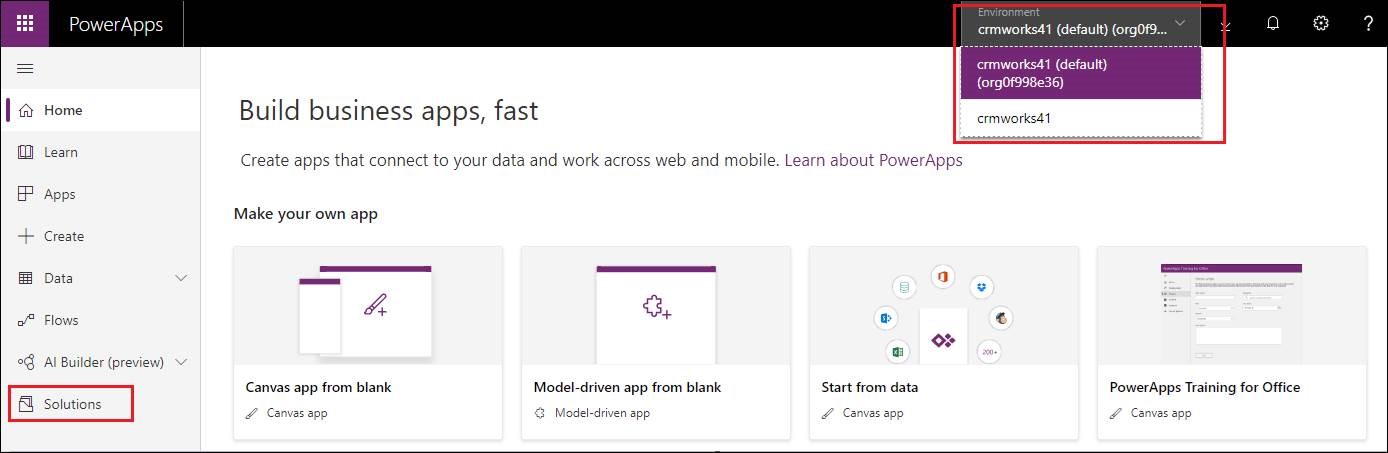
Create a new solution in that environment and then create new Flow. The flow added in this environment will be displayed in Virtual Agent portal in the ‘Action’ section.
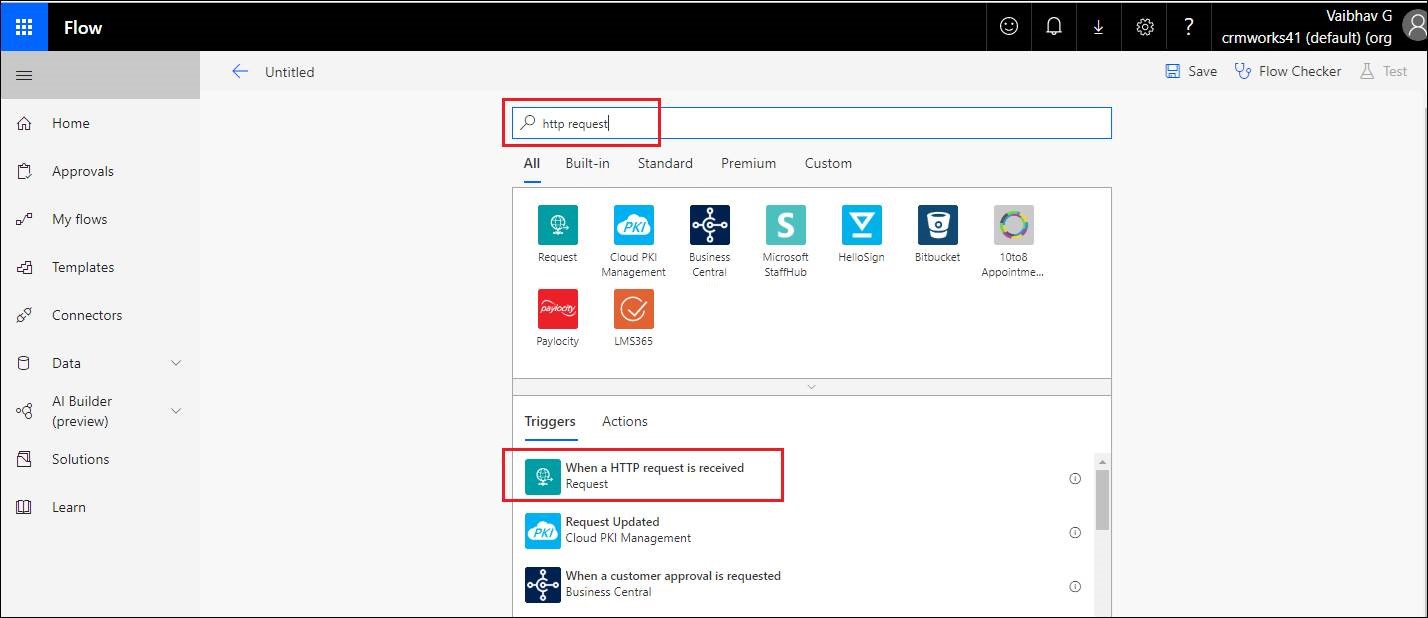
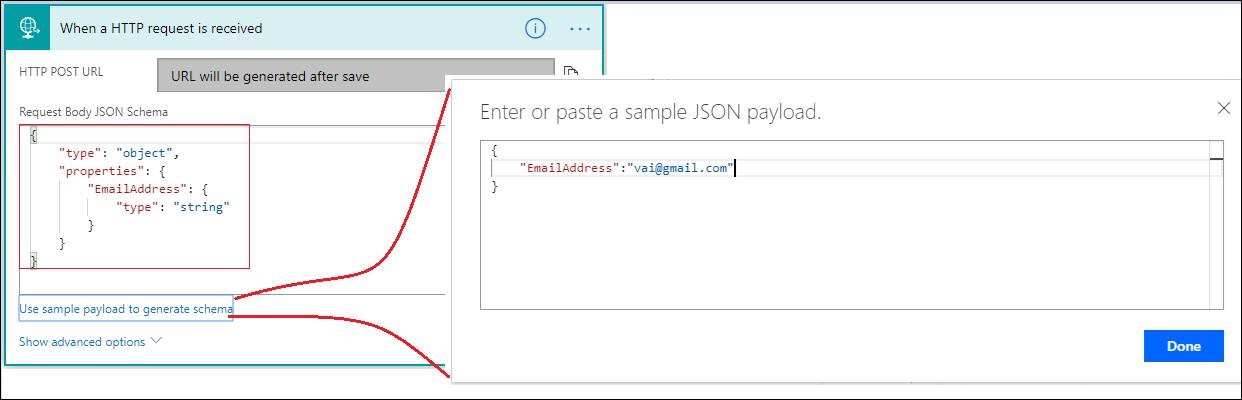
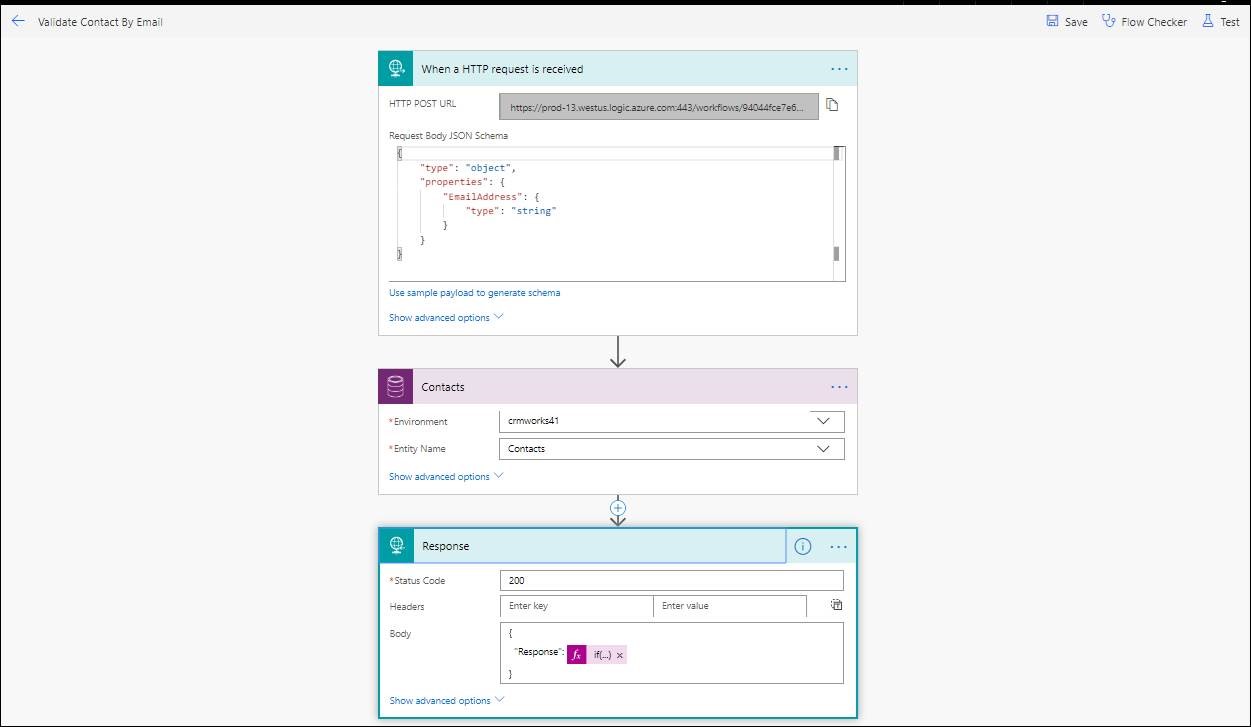
12. Create a new Microsoft Flow and select the trigger point as http request as shown in the below screen shot.
13. Add Request Body JSON schema. We can use ‘Use sample payload to generate schema’ method to generate the JSON schema. In my case I have added payload as shown below and it generates the JSON body schema.
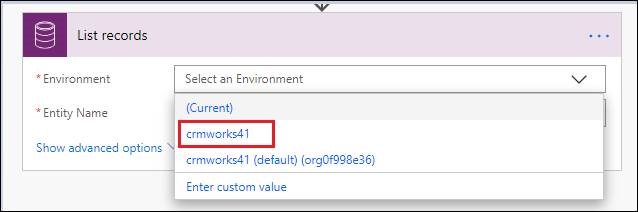
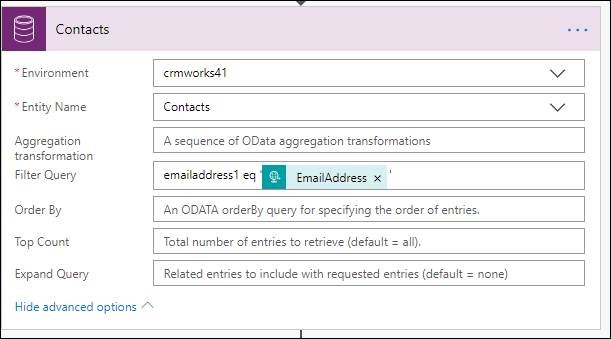
14. Add new step in Flow to add Common Data Service Connector and select ‘List Records’ action. Now select the Dynamics 365 CRM environment in CDS connector. In my case my CRM environment is different than the current environment so I have selected my CRM environment.
Configure this CDS connector to get the contacts from CRM based on the email address. EmailAddress is coming from the body of the http request.
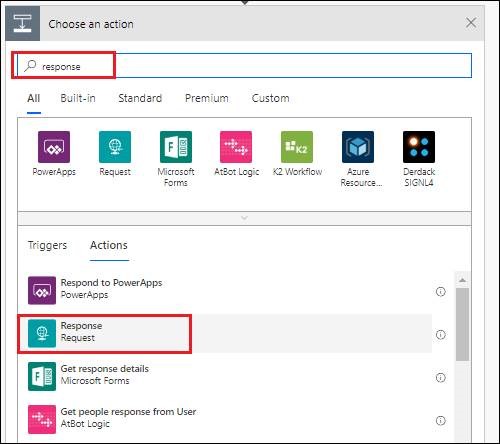
15. Now next add Response step. Here we need to add response body and the response Body JSON schema.
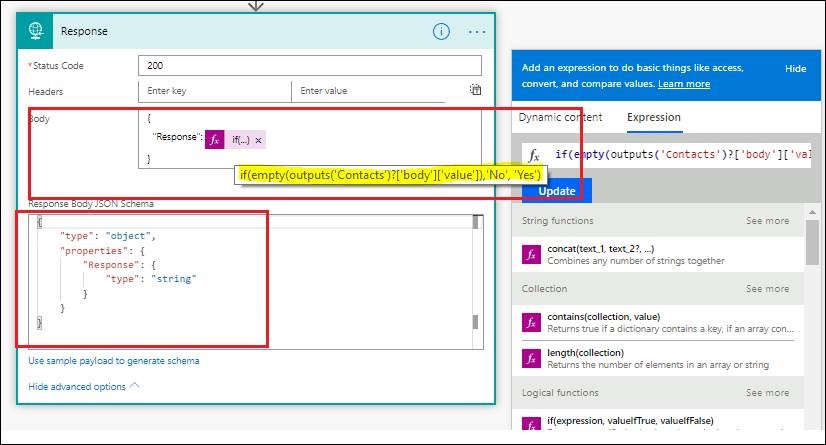
So here we are sending ‘Yes’ and ‘No’ in response. If matching contact exists in CRM then send Yes or else No. As Virtual Agent’s expression do not have support for Boolean we are sending response in string format. Here is how my entire flow will look like:
Now save this flow and check if it is getting displayed in your Topics created in Virtual Agent.
Note: if you want to modify the Flow then you have to first deactivate it. You have to make sure that the flow is active and is created in right environment.
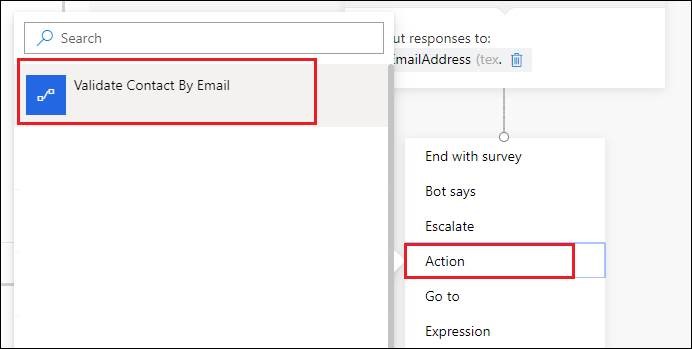
16. Let’s call this newly created flow in our Topic. Click on ‘Action’ and select the MS Flow.
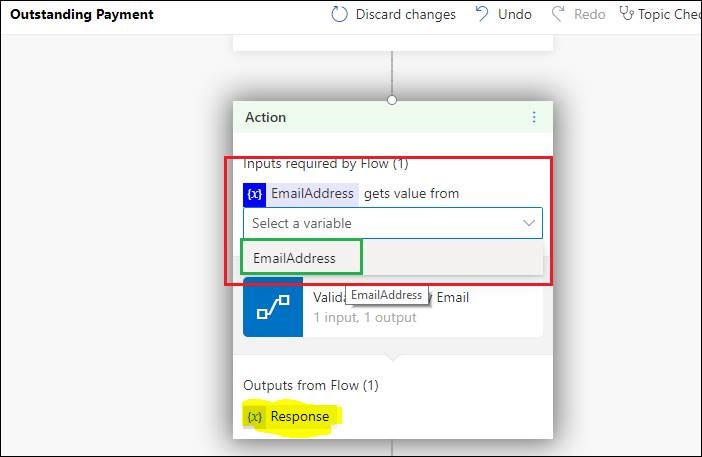
17. In next screen we will select the variable that we created in Topic and pass it to the Flow. You can also see the output from Flow. We will use it to perform further actions in the Topic.
18. Add ‘Expression’ step and check the output response from Flow. If the response is Yes then add ‘Bot Says’ step and add message like “Thank you. You are registered user. Fetching your outstanding payments” or else add message like “Sorry, you are not registered customer. Please contact our Sales rep”. In a valid scenario you can then call another Flow to get the outstanding payments from CRM for that customer.
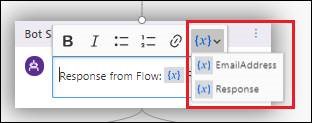
19. We can also write Flow response in ‘Bot says’ step, as shown below:
20. We can validate our topic using ‘Topic Checker’ button.

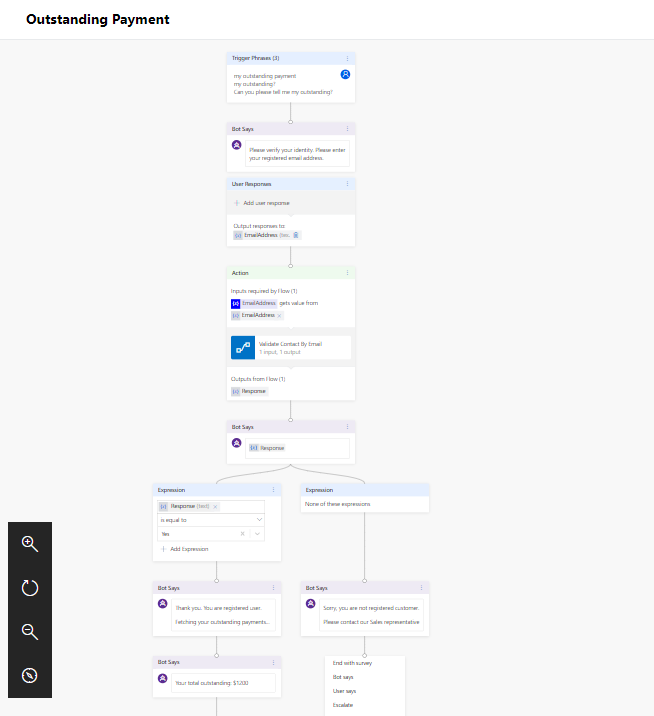
So, this way we can create and add our conversation. Now next step is to test your bot before publishing and deploying it to the website. Here is the full view of Topic.
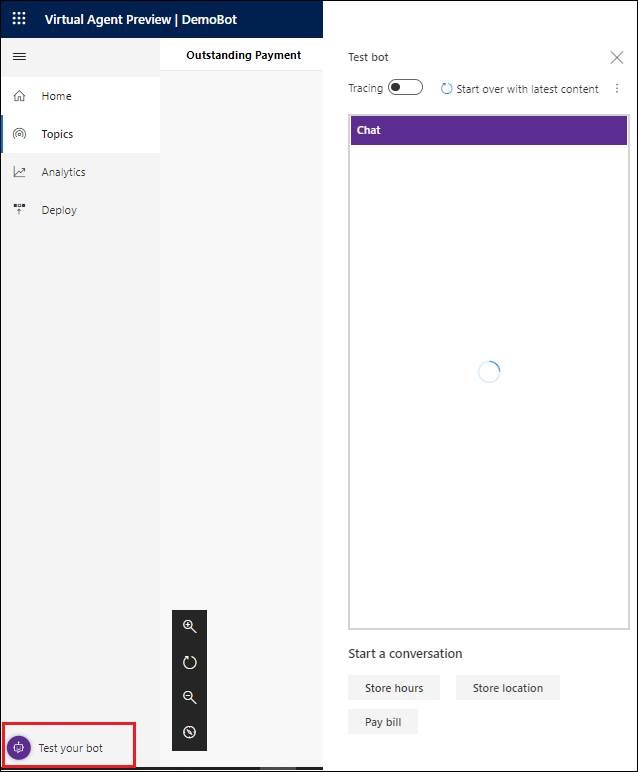
Test Dynamics 365 Virtual Agent Bot
Dynamics 365 Virtual Agent has one cool thing i.e. test your bot before publishing it. This saves a lot of time. Click on ‘Test your bot’ button and start testing the conversation.
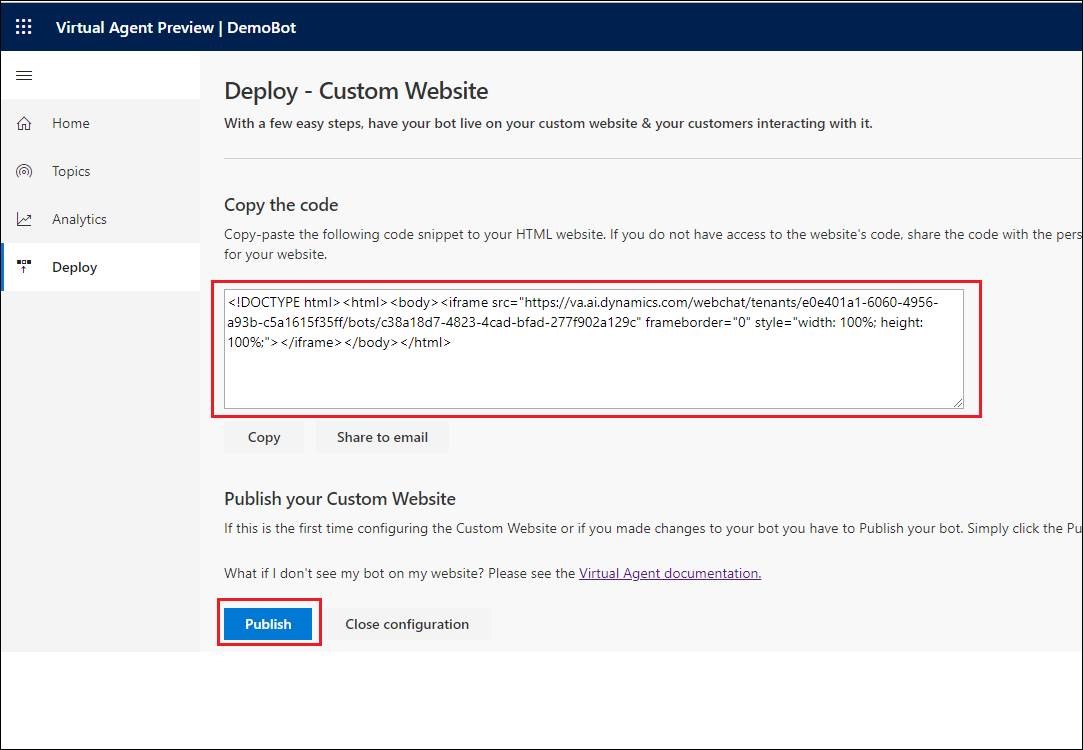
Publish and Deploy Dynamics 365 bot
Click on Deploy button and you will see two options – Demo website and custom website. Using Demo website you can directly check your bot on Microsoft’s Demo website. To publish the new changes made in your bot, you have to click on Publish button.
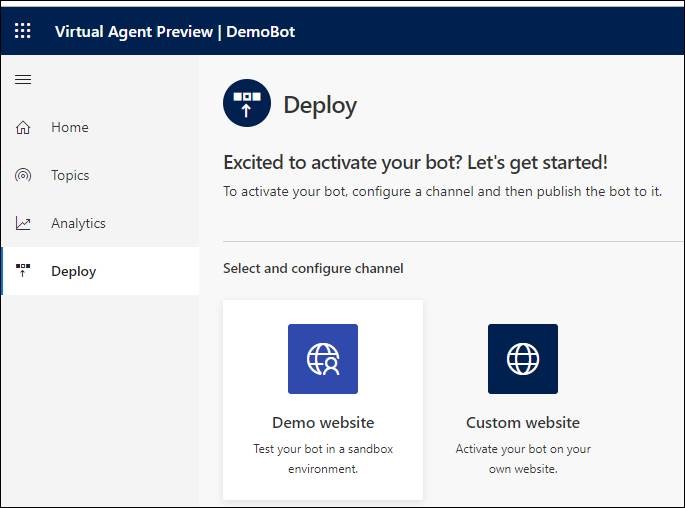
Custom website is where you will get the html IFrame content that you can embed into your website. Again you have to publish the custom website to reflect the changes on bot that you have embedded on custom website.
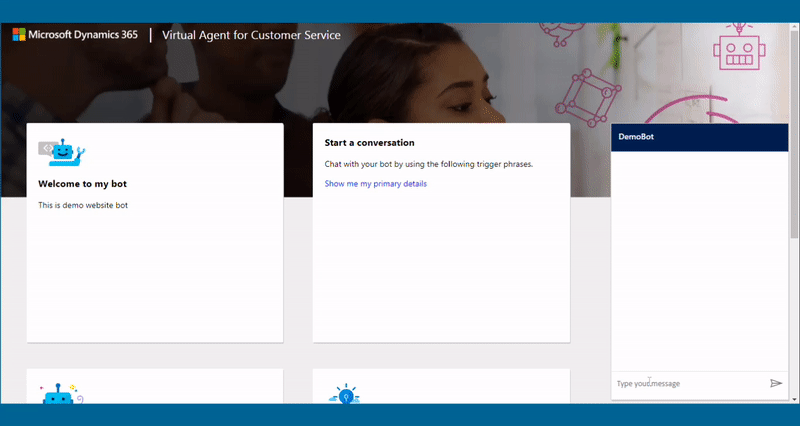
Here is the working video of the bot.
Conclusion
With Dynamics 365 Virtual Agent you can create chatbot for your website and provide exemplary customer service to your customers.
No comments:
Post a Comment